Codeless two-way binding to a WPF DataGrid
WPF 4.0 will finally contain a DataGrid. If you can't wait for that one, then all you have to do is download the current release of the WPF Toolkit. The DataGrid control in this toolkit is considered as stable, so why not give it a test drive? Let's create a list of Formula 1 Drivers and two-way data bind it to a WPF DataGrid. In our little object model -the ViewModel if you like- a Formula 1 Driver is associated to a Formula 1 Team:

Here's the startup code for the Formula 1 Driver class:
In a real life scenario a class that's involved in data binding should implement the INotifyPropertyChanged and IDataError interfaces. An example of the latter can be found in a previous article, an alternative for validating is the BindingGroup class, that I will discuss in a future article (no hyperlink yet  ). In M-V-VM applications you will probably implement this behavior by inheriting from some ViewModel base class.
Here's the implementation of the Formula 1 Team class:
The ideal collection type for complex data binding (that's binding one control to a collection of objects) is ObservableCollection(T). ObservableCollection(T) is to WPF what BindingList(T) is to WinForms. ObservableCollection(T) only implements the INotifyCollectionChanged interface. This is sufficient to do complex data binding -at least for WPF's ItemControl subclasses like ListView, ComboBox and DataGrid. In a WinForms application the ObservableCollection(T) class loses all its magic. To continue with the sample, add to the Formula 1 Driver class a method that returns such a collection:
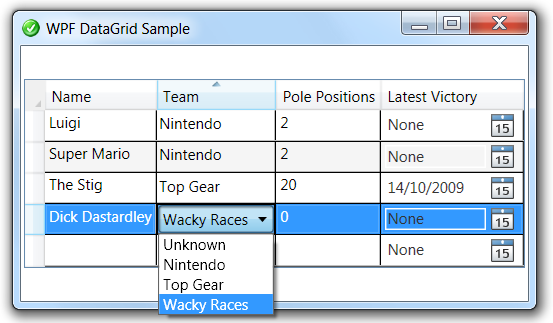
If you use this collection as ItemSource of the DataGrid, then the result should look like this:

The DataGrid has a couple of intuitive properties, as you can see in its XAML definition:
The DataGrid can be populated with four column types:
Let's look for an excuse to use a DataGridComboBoxColumn. It's not a good idea to confront end users with technical keys, so instead of showing the team's identity we'll display its name. When the grid cell is in edit mode, we let the user select from a ComboBox:
The embedded ComboBox is bound to a Dictionary, its citizens have a Key and a Value property that you should respectively bind to SelectedValuePath and DisplayMemberPath:
Make sure to specify the correct SortMemberPath. Users can sort the rows by clicking on the column header(s). The 'Team' column is bound to the TeamId, but it displays the team's name, so it should sort by name. The following screenshot shows that the grid is sorted on the Team column (notice the sort icon in the column header):

The LatestVictory property of the Formula 1 Driver is of the type DateTime. In edit mode, it makes sense to use a DatePicker control to let the user select the date. This control can also be found in the WPF Toolkit. Here's how it can be used in a DataGridTemplateColumn:
Just like any WPF control the DataPicker is über-stylable. I don't like the default GUI settings for it, so I tweaked the GUI a little bit by hiding its border and giving the embedded TextBox a transparent backcolor. You have access to this via a Style. That's also the place to override the default watermark (through the Text property):
Here's how the DatePicker looks like when it's expanded:

When inserting is allowed, then the DataGrid displays an empty row at the bottom. Unfortunately there seems to be no way to display the intuitive asterisk in its row header (look here for my solution). When you start editing this row, the default constructor of the bound type is called to initialize the cells. Here's how the one for the Formula 1 driver looks like:

For completeness' sake, here's the full XAML for the sample form:
And here's the C# code:
Here's the startup code for the Formula 1 Driver class:
namespace U2UConsult.DockOfTheBay
{
using System.Collections.Generic;
/// <summary>
/// A Formula1 Team.
/// </summary>
public class FormulaOneTeam
{
/// <summary>
/// Gets the entire list of Formula1 teams.
/// </summary>
public static Dictionary<int, FormulaOneTeam> GetAll
{
get
{
return new Dictionary<int, FormulaOneTeam>()
{
{ 0, new FormulaOneTeam { TeamId = 0, Name = "Unknown" } },
{ 1, new FormulaOneTeam { TeamId = 1, Name = "Nintendo" } },
{ 2, new FormulaOneTeam { TeamId = 2, Name = "Top Gear" } },
{ 3, new FormulaOneTeam { TeamId = 3, Name = "Wacky Races" } }
};
}
}
/// <summary>
/// Gets or sets the id of the Formula1 team.
/// </summary>
public int TeamId { get; set; }
/// <summary>
/// Gets or sets the name of the Formula1 team.
/// </summary>
public string Name { get; set; }
}
}
). In M-V-VM applications you will probably implement this behavior by inheriting from some ViewModel base class.Here's the implementation of the Formula 1 Team class:
namespace U2UConsult.DockOfTheBay
{
using System.Collections.Generic;
/// <summary>
/// A Formula1 Team.
/// </summary>
public class FormulaOneTeam
{
/// <summary>
/// The list of all Formula 1 Teams.
/// </summary>
private static Dictionary<int, FormulaOneTeam> getAll;
/// <summary>
/// Initializes static members of the FormulaOneTeam class.
/// </summary>
static FormulaOneTeam()
{
getAll = new Dictionary<int, FormulaOneTeam>()
{
{ 0, new FormulaOneTeam { TeamId = 0, Name = "Unknown" } },
{ 1, new FormulaOneTeam { TeamId = 1, Name = "Nintendo" } },
{ 2, new FormulaOneTeam { TeamId = 2, Name = "Top Gear" } },
{ 3, new FormulaOneTeam { TeamId = 3, Name = "Wacky Races" } }
};
}
/// <summary>
/// Gets the entire list of Formula 1 Teams.
/// </summary>
public static Dictionary<int, FormulaOneTeam> GetAll
{
get
{
return getAll;
}
}
/// <summary>
/// Gets or sets the id of the Formula 1 Team.
/// </summary>
public int TeamId { get; set; }
/// <summary>
/// Gets or sets the name of the Formula 1 Team.
/// </summary>
public string Name { get; set; }
}
}
/// <summary>
/// Gets a two-way bindable list of Formula 1 drivers.
/// </summary>
public static ObservableCollection<FormulaOneDriver> GetAll
{
get
{
ObservableCollection<FormulaOneDriver> drivers =
new ObservableCollection<FormulaOneDriver>()
{
new FormulaOneDriver(){ Name = "Super Mario",
TeamId = 1,
PolePositions = 2 },
new FormulaOneDriver(){ Name = "The Stig",
TeamId = 2,
PolePositions = 20,
LatestVictory = DateTime.Today },
new FormulaOneDriver(){ Name = "Dick Dastardley",
TeamId = 3,
PolePositions = 0 },
new FormulaOneDriver(){ Name = "Luigi",
TeamId = 1,
PolePositions = 2 }
};
return drivers;
}
}
The DataGrid has a couple of intuitive properties, as you can see in its XAML definition:
<toolkit:DataGrid
x:Name="DriversDataGrid"
ItemsSource="{Binding Source={x:Static local:FormulaOneDriver.GetAll}}"
AutoGenerateColumns="False"
CanUserAddRows="True"
CanUserDeleteRows="True"
CanUserSortColumns="True"
CanUserReorderColumns="True"
AlternatingRowBackground="WhiteSmoke"
RowHeaderWidth="16"
Grid.Column="0" Grid.Row="0"
HorizontalAlignment="Center"
VerticalAlignment="Center">
<!-- toolkit:DataGrid.Columns [...] -->
</toolkit:DataGrid>
- DataGridTextColumn,
- DataGridCheckBoxColumn,
- DataGridComboBoxColumn,
- DataGridHyperlinkColumn, and
- DataGridTemplateColumn.
<toolkit:DataGridTextColumn
Header="Name"
Binding="{Binding Name}"
CanUserReorder="True"
IsReadOnly="False"
CanUserSort="True"
SortMemberPath="Name"/>
The embedded ComboBox is bound to a Dictionary, its citizens have a Key and a Value property that you should respectively bind to SelectedValuePath and DisplayMemberPath:
<toolkit:DataGridComboBoxColumn
x:Name="TeamsCombo"
Header="Team"
ItemsSource="{Binding Source={x:Static local:FormulaOneTeam.GetAll}}"
SelectedValueBinding="{Binding TeamId}"
SelectedValuePath="Key"
DisplayMemberPath="Value.Name"
SortMemberPath="Team.Name" />
The LatestVictory property of the Formula 1 Driver is of the type DateTime. In edit mode, it makes sense to use a DatePicker control to let the user select the date. This control can also be found in the WPF Toolkit. Here's how it can be used in a DataGridTemplateColumn:
<toolkit:DataGridTemplateColumn
Header="Latest Victory"
CanUserSort="True"
SortMemberPath="LatestVictory">
<toolkit:DataGridTemplateColumn.CellTemplate >
<DataTemplate >
<toolkit:DatePicker
SelectedDate="{Binding LatestVictory}"
BorderThickness="0"/>
</DataTemplate >
</toolkit:DataGridTemplateColumn.CellTemplate >
</toolkit:DataGridTemplateColumn>
<Style TargetType="{x:Type toolkit:DatePickerTextBox}">
<Setter Property="Text" Value="None" />
<Setter Property="Background" Value="#00000000" />
</Style>
When inserting is allowed, then the DataGrid displays an empty row at the bottom. Unfortunately there seems to be no way to display the intuitive asterisk in its row header (look here for my solution). When you start editing this row, the default constructor of the bound type is called to initialize the cells. Here's how the one for the Formula 1 driver looks like:
/// <summary>
/// Initializes a new instance of the FormulaOneDriver class.
/// </summary>
public FormulaOneDriver()
{
this.Name = "<Name>";
}
For completeness' sake, here's the full XAML for the sample form:
<Window
x:Class="U2UConsult.DockOfTheBay.DataGridSampleWindow"
xmlns="http://schemas.microsoft.com/winfx/2006/xaml/presentation"
xmlns:x="http://schemas.microsoft.com/winfx/2006/xaml"
xmlns:local="clr-namespace:U2UConsult.DockOfTheBay"
xmlns:toolkit="http://schemas.microsoft.com/wpf/2008/toolkit"
Title="WPF DataGrid Sample"
SizeToContent="WidthAndHeight"
Icon="/DataGridSample;component/dotbay.png" >
<Window.Resources>
<Style TargetType="{x:Type toolkit:DatePickerTextBox}">
<Setter Property="Text" Value="None" />
<Setter Property="Background" Value="#00000000" />
</Style>
</Window.Resources>
<Grid>
<toolkit:DataGrid
x:Name="DriversDataGrid"
ItemsSource="{Binding Source={x:Static local:FormulaOneDriver.GetAll}}"
AutoGenerateColumns="False"
CanUserAddRows="True"
CanUserDeleteRows="True"
CanUserSortColumns="True"
CanUserReorderColumns="True"
AlternatingRowBackground="WhiteSmoke"
RowHeaderWidth="16"
Grid.Column="0" Grid.Row="0"
HorizontalAlignment="Center"
VerticalAlignment="Center">
<toolkit:DataGrid.Columns>
<toolkit:DataGridTextColumn
Header="Name"
Binding="{Binding Name}"
CanUserReorder="True"
IsReadOnly="False"
CanUserSort="True"
SortMemberPath="Name"/>
<toolkit:DataGridComboBoxColumn
x:Name="TeamsCombo"
Header="Team"
ItemsSource="{Binding Source={x:Static local:FormulaOneTeam.GetAll}}"
SelectedValueBinding="{Binding TeamId}"
SelectedValuePath="Key"
DisplayMemberPath="Value.Name"
SortMemberPath="Team.Name" />
<toolkit:DataGridTextColumn
Header="Pole Positions"
Binding="{Binding PolePositions}"
CanUserSort="True" />
<toolkit:DataGridTemplateColumn
Header="Latest Victory"
CanUserSort="True"
SortMemberPath="LatestVictory">
<toolkit:DataGridTemplateColumn.CellTemplate >
<DataTemplate >
<toolkit:DatePicker
SelectedDate="{Binding LatestVictory}"
BorderThickness="0"/>
</DataTemplate >
</toolkit:DataGridTemplateColumn.CellTemplate >
</toolkit:DataGridTemplateColumn>
</toolkit:DataGrid.Columns>
</toolkit:DataGrid>
</Grid>
</Window>
namespace U2UConsult.DockOfTheBay
{
using System.Windows;
/// <summary>
/// Two-way binding to a Data Grid Sample.
/// </summary>
/// <remarks>Not much to see here: it's all in the XAML.</remarks>
public partial class DataGridSampleWindow : Window
{
/// <summary>
/// Initializes a new instance of the DataGridSampleWindow class.
/// </summary>
public DataGridSampleWindow()
{
InitializeComponent();
}
}
}
In WPF, SelectionChanged does not mean that the selection changed
Windows Presentation Foundation's Routed Events can lead to unexpected or at least nonintuitive behavior when using TabControls that contain ListViews and/or ComboBoxes. A routed event generally bubbles from the control that raised it, up the whole element tree until the root. On its way up it invokes handlers on multiple listeners. This makes a lot of sense in the ButtonBase.Click Event: if a button is clicked, then its containing element is also clicked.
By design, the Selector.SelectionChanged Event is such a routed event. TabItem, ListBox, and ComboBox all inherit from Selector, so if you put them in a hierarchy they will register on each other's events. A ComboBox that appears via a template in a ListBox will raise the SelectionChanged event of that ListBox - even if the user didn't select a new ListBoxItem. If you put that ListBox in a TabControl, then the SelectionChanged on that TabControl will also be fired - even if the user didn't select a new TabItem.
Enough talking: let's build a small demo. First we build a Window with a TabControl that has a ComboBox in its first TabItem:
XAML
C#
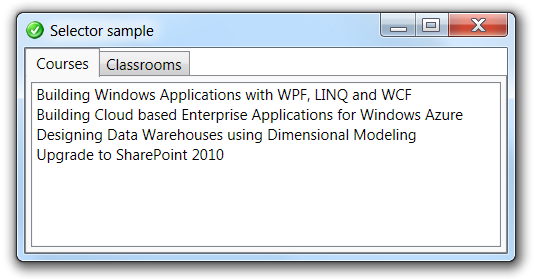
Switching from one tab to another behaves nicely. Unfortunately, clicking in the ListBox now also triggers the SelectionChanged event from the TabControl itself, resulting in unexpected behavior:

Before diving into solutions, let's make it worse by implementing a very popular pattern. When the user navigates to a new TabItem, we populate a ListBox, and programatically select its first item. In theory there's nothing wrong with this, in practice it creates an infinite loop (well, it's not really infinite: it stops when you're out of stack space):

We can solve this by letting the child controls prevent the event from propagating -via the Handled property- like this:
XAML
C#
Of course, not all child controls will have an event handler or even need one (e.g. a ComboBox bound to a property of a Business Entity). Moreover, the parent control can not depend on the implementation of his children. Fortunately the parent control can decide to ignore all bubbled events from child controls like this:
C#
In practice this means that you should program this check on OriginalSource not only in every TabControl (because its TabItems can contain ListBoxes and ComboBoxes), but also in every ListBox (because its template can contain ComboBoxes).
By design, the Selector.SelectionChanged Event is such a routed event. TabItem, ListBox, and ComboBox all inherit from Selector, so if you put them in a hierarchy they will register on each other's events. A ComboBox that appears via a template in a ListBox will raise the SelectionChanged event of that ListBox - even if the user didn't select a new ListBoxItem. If you put that ListBox in a TabControl, then the SelectionChanged on that TabControl will also be fired - even if the user didn't select a new TabItem.
Enough talking: let's build a small demo. First we build a Window with a TabControl that has a ComboBox in its first TabItem:
XAML
<Window x:Class="DockOfTheBay.SelectorSampleWindow"
xmlns="http://schemas.microsoft.com/winfx/2006/xaml/presentation"
xmlns:x="http://schemas.microsoft.com/winfx/2006/xaml"
Title="Selector sample" Height="200" Width="400" >
<Grid>
<TabControl
x:Name="MainTabControl"
SelectionChanged="MainTabControl_SelectionChanged" >
<TabItem Header="Courses" >
<TabItem.Content>
<ListBox x:Name="ListBox1" />
</TabItem.Content>
</TabItem>
<TabItem Header="Classrooms" >
</TabItem>
</TabControl>
</Grid>
</Window>
C#
/// <summary>
/// The selection in the main tab control was changed.
/// </summary>
/// <param name="sender">Sender of the event: the Main Tab.</param>
/// <param name="e">Event arguments.</param>
private void MainTabControl_SelectionChanged(object sender, SelectionChangedEventArgs e)
{
// First Tab
if (this.MainTabControl.SelectedIndex == 0)
{
// (Re-)Populate ListBox
this.ListBox1.Items.Clear();
this.ListBox1.Items.Add("Building Windows Applications with WPF, LINQ and WCF");
this.ListBox1.Items.Add("Building Cloud based Enterprise Applications for Windows Azure");
this.ListBox1.Items.Add("Designing Data Warehouses using Dimensional Modeling");
this.ListBox1.Items.Add("Upgrade to SharePoint 2010");
}
}
Switching from one tab to another behaves nicely. Unfortunately, clicking in the ListBox now also triggers the SelectionChanged event from the TabControl itself, resulting in unexpected behavior:
Before diving into solutions, let's make it worse by implementing a very popular pattern. When the user navigates to a new TabItem, we populate a ListBox, and programatically select its first item. In theory there's nothing wrong with this, in practice it creates an infinite loop (well, it's not really infinite: it stops when you're out of stack space):
We can solve this by letting the child controls prevent the event from propagating -via the Handled property- like this:
XAML
<TabItem Header="Courses" >
<TabItem.Content>
<ListBox x:Name="ListBox1"
SelectionChanged="ListBox1_SelectionChanged" />
</TabItem.Content>
</TabItem>
C#
/// <summary>
/// The selection in the listbox was changed.
/// </summary>
/// <param name="sender">Sender of the event: the ListBox.</param>
/// <param name="e">Event arguments.</param>
private void ListBox1_SelectionChanged(object sender, SelectionChangedEventArgs e)
{
// Stop the event from bubbling.
e.Handled = true;
}
Of course, not all child controls will have an event handler or even need one (e.g. a ComboBox bound to a property of a Business Entity). Moreover, the parent control can not depend on the implementation of his children. Fortunately the parent control can decide to ignore all bubbled events from child controls like this:
C#
/// <summary>
/// The selection in the main tab control was changed.
/// </summary>
/// <param name="sender">Sender of the event: the Main Tab.</param>
/// <param name="e">Event arguments.</param>
private void MainTabControl_SelectionChanged(object sender, SelectionChangedEventArgs e)
{
// Ignore Routed Events from children
if (e.OriginalSource == this.MainTabControl)
{
// First Tab
if (this.MainTabControl.SelectedIndex == 0)
{
// (Re-)Populate ListBox
this.ListBox1.Items.Clear();
this.ListBox1.Items.Add("Building Windows Applications with WPF, LINQ and WCF");
this.ListBox1.Items.Add("Building Cloud based Enterprise Applications for Windows Azure");
this.ListBox1.Items.Add("Designing Data Warehouses using Dimensional Modeling");
this.ListBox1.Items.Add("Upgrade to SharePoint 2010");
// Select first item (no more 'Kaboom')
this.ListBox1.SelectedIndex = 0;
}
}
}
In practice this means that you should program this check on OriginalSource not only in every TabControl (because its TabItems can contain ListBoxes and ComboBoxes), but also in every ListBox (because its template can contain ComboBoxes).
System.Data.OracleClient requires Oracle client software version 8.1.7 or greater
This error occurs very often after publishing an Oracle-consuming Web Site, WCF Service, or SSRS Report to the production environment. Your first reaction should be to check if indeed an Oracle client ìs installed on the machine. Microsoft's System.Data.OracleClient is just not enough.
If an Oracle client was installed and the error still occurs, then you should check its ACLs. Your service might be running under an account that does not have file permissions to the Oracle client runtime. You can solve this issue by making sure that the content of the ORACLE_HOME directory is visible to all technical and impersonated users on the machine - in reality that simply boils down to all Authenticated Users.
Here's the recipe:
- Log on to the server as a user with Administrator privileges.
- Start Window Explorer and navigate to the ORACLE_HOME folder, most probably C:\oracle\version.
- Rightclick and select "Properties" on the ORACLE_HOME folder.
- Click the “Security” tab of the “Properties” window.
- Select “Authenticated Users” item in the “Group or User names” list.
- Uncheck and then recheck the “Read and Execute” box in the “Permissions” list under the “Allow” column.

- Click the “Advanced” button in the “Permission Entries” to verify that “Authenticated Users” are listed with permission = “Read & Execute”, and make sure that "Apply To" shows “This folder, subfolders and files”.
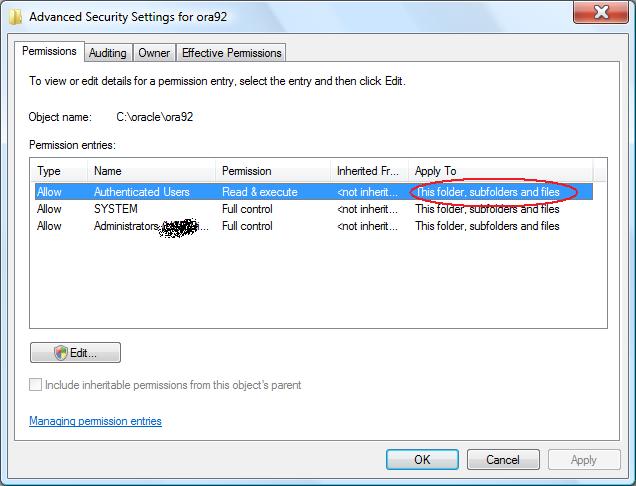
- Click “OK” buttons to close all of the security properties windows. Be patient, it may take Windows a couple of seconds to complete the modifications.
- Restart IIS and try the application. If the problem persists, then reboot (security information is almost always cached somewhere...).
Accessing controls in a WPF ItemTemplate
Programmatically accessing a control in an ItemTemplate is not so straightforward. We clearly need to call the FindName method, but not before we first find the receiver of that call...
Let's say we have a listbox databound to a list of Book instances. The Book class looks like this:
Books are displayed via an itemtemplate that contains a checkbox bound to the Discontinued property. For one or another reason, we want to programmatically enable or disable that checkbox. For demo purposes, let's implement a button that toggles the IsEnabled property of all checkboxes.
This is the XAML for the demo form:
The form looks like this:

Let's implement the button's event handler. We have to iterate through the listbox's items. Thanks to data binding, these items are all Book -not ListBoxItem- instances. We gain access to the surrounding user interface element through a ItemContainerGenerator.ContainerFromItem call. The Content property of that listBoxItem refers back to the Book instance, so in order to access the child controls we have to follow another path: that of its ContentPresenter. We find it by walking through the VisualTree, looking for an instance of the appropriate type. The next extension method can be very useful here:
Eventually, the ContentTemplate of that presenter is the DataTemplate instance to which we'll send the FindName call. Here's the C# for the entire form:
Let's say we have a listbox databound to a list of Book instances. The Book class looks like this:
namespace DockOfTheBay{ using System; using System.Collections.Generic; using System.Linq; using System.Text;/// <summary>
/// Sample book class.
/// </summary>
public class Book
{/// <summary>
/// Gets or sets the title of the book.
/// </summary>
public string Title { get; set; }
/// <summary>
/// Get or sets a value indicating whether the book is still on sale.
/// </summary>
public bool Discontinued { get; set; }
}
}
Books are displayed via an itemtemplate that contains a checkbox bound to the Discontinued property. For one or another reason, we want to programmatically enable or disable that checkbox. For demo purposes, let's implement a button that toggles the IsEnabled property of all checkboxes.
This is the XAML for the demo form:
<Window x:Class="DockOfTheBay.Window1"
xmlns="http://schemas.microsoft.com/winfx/2006/xaml/presentation"
xmlns:x="http://schemas.microsoft.com/winfx/2006/xaml"
xmlns:local="clr-namespace:DockOfTheBay"
Title="ItemTemplate Access"
Height="160" Width="200"
ResizeMode="NoResize">
<Window.Resources>
<DataTemplate x:Key="BookTemplate" DataType="{x:Type local:Book}">
<Grid>
<Grid.RowDefinitions>
<RowDefinition Height="auto"/>
</Grid.RowDefinitions>
<Grid.ColumnDefinitions>
<ColumnDefinition Width="auto" SharedSizeGroup="Title" />
<ColumnDefinition Width="auto" SharedSizeGroup="Discontinued" />
</Grid.ColumnDefinitions>
<TextBlock Text="{Binding Path=Title}"
Grid.Row="0" Grid.Column="0" Margin="2"/>
<CheckBox x:Name="DiscontinuedCheckBox"
IsChecked="{Binding Discontinued}"
IsEnabled="False"
Grid.Row="0" Grid.Column="1"
Margin="2"/>
</Grid>
</DataTemplate>
</Window.Resources>
<Grid Grid.IsSharedSizeScope="True">
<Grid.RowDefinitions>
<RowDefinition Height="auto"/>
<RowDefinition Height="auto" />
</Grid.RowDefinitions>
<Grid.ColumnDefinitions>
<ColumnDefinition Width="*"/>
</Grid.ColumnDefinitions>
<ListBox x:Name="BookListBox"
ItemTemplate="{StaticResource BookTemplate}"
Grid.Row="0" Grid.Column="0"
HorizontalAlignment="Center"
Margin="4" BorderThickness="0" />
<Button x:Name="ToggleButton"
Click="ToggleButton_Click"
Content="Toggle Checkbox Access"
Grid.Row="1" Grid.Column="0"
HorizontalAlignment="Center"
Margin="4" />
</Grid>
</Window>
The form looks like this:
Let's implement the button's event handler. We have to iterate through the listbox's items. Thanks to data binding, these items are all Book -not ListBoxItem- instances. We gain access to the surrounding user interface element through a ItemContainerGenerator.ContainerFromItem call. The Content property of that listBoxItem refers back to the Book instance, so in order to access the child controls we have to follow another path: that of its ContentPresenter. We find it by walking through the VisualTree, looking for an instance of the appropriate type. The next extension method can be very useful here:
namespace DockOfTheBay{ using System; using System.Collections.Generic; using System.Linq; using System.Text; using System.Windows; using System.Windows.Media;/// <summary>
/// Extension methods to the DependencyObject class.
/// </summary>
public static class DependencyObjectExtensions
{/// <summary>
/// Find a child of a specific type in the Visual Tree.
/// </summary>
public static T FindVisualChild<T>(this DependencyObject obj) where T : DependencyObject
{for (int i = 0; i < VisualTreeHelper.GetChildrenCount(obj); i++)
{DependencyObject child = VisualTreeHelper.GetChild(obj, i);
if (child != null && child is T)
{ return (T)child;}
else {T grandChild = child.FindVisualChild<T>();
if (grandChild != null)
{ return grandChild;}
}
}
return null;
}
}
}
Eventually, the ContentTemplate of that presenter is the DataTemplate instance to which we'll send the FindName call. Here's the C# for the entire form:
namespace DockOfTheBay{ using System.Collections.Generic; using System.Windows; using System.Windows.Controls; using System.Windows.Documents;/// <summary>
/// Interaction logic for Window1.xaml
/// </summary>
public partial class Window1 : Window
{/// <summary>
/// Initializes a new instance of the Window1 class.
/// </summary>
public Window1() {InitializeComponent();
this.FillListBox();}
/// <summary>
/// Fills the listbox with some sample books.
/// </summary>
private void FillListBox()
{List<Book> books = new List<Book>();
books.Add(new Book { Title = "WPF Unleashed ", Discontinued = false });
books.Add(new Book { Title = "WinForms in action", Discontinued = true });
books.Add(new Book { Title = "The iBook for Dummies", Discontinued = false });
books.Add(new Book { Title = "Essential WPF", Discontinued = false });
this.BookListBox.ItemsSource = books;}
/// <summary>
/// Toggle the access to the CheckBox.
/// </summary>
/// <param name="sender">Sender of the event (button).</param>
/// <param name="e">Event arguments.</param>
private void ToggleButton_Click(object sender, RoutedEventArgs e)
{ // Iterate through Booksforeach (var item in this.BookListBox.Items)
{ // Get the ListBoxItem around the Book ListBoxItem listBoxItem =this.BookListBox.ItemContainerGenerator.ContainerFromItem(item) as ListBoxItem;
// Get the ContentPresenterContentPresenter presenter = listBoxItem.FindVisualChild<ContentPresenter>();
// Get the Template instance DataTemplate template = presenter.ContentTemplate; // Find the CheckBox within the TemplateCheckBox checkBox = template.FindName("DiscontinuedCheckBox", presenter) as CheckBox;
checkBox.IsEnabled = !checkBox.IsEnabled;
}
}
}
}
Subscribe to:
Posts (Atom)